Difference between revisions of "Construction: excavation and rough grade"
Jump to navigation
Jump to search
Kyle menken (talk | contribs) |
|||
| (3 intermediate revisions by one other user not shown) | |||
| Line 1: | Line 1: | ||
<u>Excavation</u> to the specified depths in the drawings is critical to the LID feature’s future performance. It also requires heavy machinery which, if used incorrectly, can compact soils and lower their native infiltration rates. <br/> | |||
Excavation to the specified depths in the drawings is critical to the LID feature’s future performance. It also requires heavy machinery which, if used incorrectly, can compact soils and lower their native infiltration rates. <br/> | |||
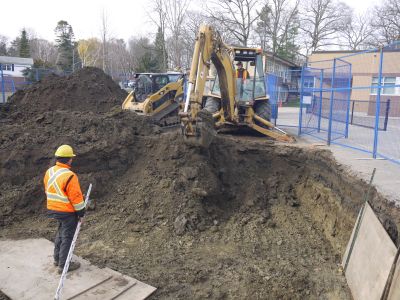
[[File:Excavation outside in 2.JPG|400px|thumb|Excavating from impervious surfaces adjacent to the LID practice minimizes compaction.|right]] | [[File:Excavation outside in 2.JPG|400px|thumb|Excavating from impervious surfaces adjacent to the LID practice minimizes compaction.|right]] | ||
'''Construction steps''' | '''Construction steps''' | ||
| Line 8: | Line 7: | ||
#Cut and stabilize channels and slopes. | #Cut and stabilize channels and slopes. | ||
#Excavate the LID feature from the outside-in whenever possible. A standard excavator (10-45 tons) has a longer reach than mini (<6 tons) or midi excavators (6-10 tons) and can be the best choice despite its weight, since it may not need to enter into the facility’s footprint to complete the job. However, a mini excavator would be the best choice if entry into the LID feature’s footprint is necessary. | #Excavate the LID feature from the outside-in whenever possible. A standard excavator (10-45 tons) has a longer reach than mini (<6 tons) or midi excavators (6-10 tons) and can be the best choice despite its weight, since it may not need to enter into the facility’s footprint to complete the job. However, a mini excavator would be the best choice if entry into the LID feature’s footprint is necessary. | ||
#Excavate to within 100 mm of the final grade | #Excavate to within 100 mm of the final grade. | ||
#Check grades with appropriate equipment (transit levels, etc.) | #Check grades with appropriate equipment (transit levels, etc.). | ||
#Stockpile materials in a designated area if it must be stored before hauling | #Stockpile materials in a designated area if it must be stored before hauling. | ||
'''Key inspection points:''' | '''Key inspection points:''' | ||
*Confirm the limit of excavation. | *Confirm the limit of excavation. | ||
| Line 20: | Line 19: | ||
*If appropriate, field verify infiltration rates at excavated bottom of practice using Guelph permeameter or double ring infiltrometer | *If appropriate, field verify infiltration rates at excavated bottom of practice using Guelph permeameter or double ring infiltrometer | ||
'''Mistakes to avoid:''' | '''Mistakes to avoid:''' | ||
* | *making too many passes with heavy machinery within the LID footprint. | ||
* | *leaving heavy machinery within the LID’s footprint (for breaks, lunch, overnight, etc.) | ||
* | *using the wrong equipment | ||
* | *over excavating | ||
* | *smearing the bottom of the practice with the bucket, which can compact native soils | ||
Latest revision as of 14:58, 22 September 2022
Excavation to the specified depths in the drawings is critical to the LID feature’s future performance. It also requires heavy machinery which, if used incorrectly, can compact soils and lower their native infiltration rates.
Construction steps
- Mark out the limit of excavation.
- Use predefined access routes to move heavy equipment.
- Cut and stabilize access and staging areas.
- Cut and stabilize channels and slopes.
- Excavate the LID feature from the outside-in whenever possible. A standard excavator (10-45 tons) has a longer reach than mini (<6 tons) or midi excavators (6-10 tons) and can be the best choice despite its weight, since it may not need to enter into the facility’s footprint to complete the job. However, a mini excavator would be the best choice if entry into the LID feature’s footprint is necessary.
- Excavate to within 100 mm of the final grade.
- Check grades with appropriate equipment (transit levels, etc.).
- Stockpile materials in a designated area if it must be stored before hauling.
Key inspection points:
- Confirm the limit of excavation.
- Use of excavation equipment specified in the contract, in the required manner (from the outside in, with a mini excavator, etc.).
- Confirm excavated rough grade and final grade prior to backfilling using survey equipment
- Use of toothed bucket and scouring the bottom of practice if applicable
- If appropriate, measure compaction using a cone penetration test or a cone penetrometer
- If appropriate, field verify infiltration rates at excavated bottom of practice using Guelph permeameter or double ring infiltrometer
Mistakes to avoid:
- making too many passes with heavy machinery within the LID footprint.
- leaving heavy machinery within the LID’s footprint (for breaks, lunch, overnight, etc.)
- using the wrong equipment
- over excavating
- smearing the bottom of the practice with the bucket, which can compact native soils
