From LID SWM Planning and Design Guide
Jump to navigation
Jump to search
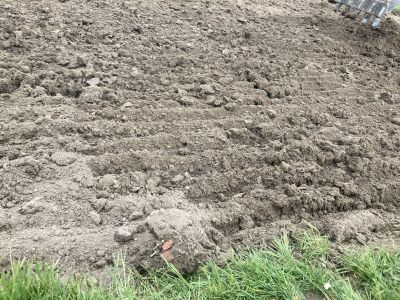
Grooves perpendicular to the grade help prevent the development of rills.
If left unchecked, rills can develop into gullies. (Photo source:
CVC, 2022)
STEP’s Erosion and Sediment Control Guide contains detailed guidance on the design, installation, inspection, maintenance, and decommissioning of ESC measures. This section gives practical advice on structural and non-structural ESC for contractors, inspectors, and those who are new to construction and ESC practices.
Establish required perimeter controls, including erosion and sediment control (ESC) measures, prior to construction and adjust accordingly during construction. ESC measures come in two basic types: structural ESC, which slows and holds runoff from the disturbed area, dissipating erosive forces, promoting ponding, and allowing suspended particles to settle out; and non-structural ESC, which primarily minimizes the exposure time of stripped soils.
For non-structural ESC measures, be sure to:
- Stage clearing and grubbing to minimize exposure of stripped soils.
- Watch the weather and adjust plans accordingly.
- Manage and demarcate heavy equipment routes away from LID practices.
- Use simple, common-sense methods, such as scarifying exposed soils perpendicular to the grade to prevent the development of rills.
- Create and use a pollution prevention plan for fuels or solvents.
Generally, all exposed soils that are not being actively worked on must have temporary erosion protection or permanent cover within 7 days for slopes 3:1 or greater and 14 days for slopes 3:1 or lesser. This should apply to all exposed soil areas year-round and until the site is stabilized.
The table below gives guidance on common mistakes made when installing structural ESC measures.
Best practices and common errors when installing structural erosion and sediment control measures
| Structural ESC measure
|
Do
|
Don't
|
(Pass) Photo Example
|
(Fail) Photo Example
|
| Sediment fencing
|
- Stake it in, support it, and double it up adjacent to natural heritage features.
|
- Leave vulnerable points with insufficient supports.
|
 This sediment fencing has been doubled up and staked in. As a result, it kept a large amount of sediment from entering the adjacent natural heritage feature. It is in need of immediate maintenance, however. (Photo source: CVC) |
 This sediment fencing was not staked in at the likely point of failure, resulting in the release of sediment into an adjacent natural heritage feature. (Photo Source: CISEC) |
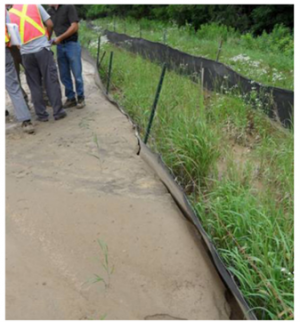
| Inlet controls
|
- Support and stake in inlet controls such as sediment socks.
- Use catch basin inserts as a final line of protection.
|
- Leave inlets to the stormwater management system unprotected or unsupported
|
 This filter stock has been staked in and supported. (Source: CVC) |
 This catch basin was left unprotected, resulting in the release of sediment into the stormwater management system. (Photo source: CISEC) |
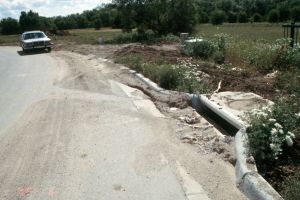
| Stockpiles
|
- Sling soil and aggregates into the facility when possible.
- Install soil and aggregates upon arrival to the site when possible.
|
- Store materials within the stormwater management system, e.g., in the roadway.
- Leave stockpiles unprotected when wet weather is expected.
|
|
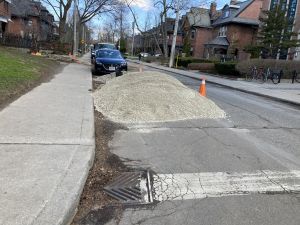 If it were to rain, fines from this stockpile would go straight into the downstream catchbasin. (Photo source: CVC) |
| Protecting features during construction, including using sacrificial filter fabric
|
- Use sacrificial filter fabric when necessary to protect features, and leave ESC measures in place until all construction in the LID's drainage area is complete.
|
- Remove ESC measures early or allow sediment to enter the LID footprint.
|
|
 ESC measures at this bioretention feature were removed before construction in its drainage was complete, allowing sediment into it. |


.jpg)


