Green roof construction

Overview[edit]
Green roofs are composed of several layers (waterproof membrane or existing membrane, root barrier, drainage layer, filter fabric, growing medium) that support the growth of plants and other vegetation on top of a roof. Growing medium depth determines which plants can be planted, and the components of green roofs can either be loose-laid or fused together. The proper installation of green roofs can help to achieve water balance targets, promote biodiversity and provide green space. Some key resources for green roof construction include the following:
- City of Toronto Green Roof Construction Standard Supplementary Guidelines (City of Toronto & Livegreen Toronto, 2017)[1]
- Greenroofs.org (Greenroofs.org, n.d.)[2]
- Low Impact Development Stormwater Management Practice Inspection and Maintenance Guide (TRCA, 2016)[3]
Types[edit]
There are two main types of green roof systems: extensive and intensive.
- Extensive green roofs have growing medium depths of 10 cm to 15 cm (0.1 m to 0.15 m), maximum structural weight loads of 250 kg/m2, and vegetation is primarily limited to sedum spp or commonly known as stone crop. For information on plants that are often included in extensive green roofs, see this list.
- Intensive green roofs have growing medium depths greater than 15 cm (0.15 m), no maximum structural weight load. Intensive green roofs can be planted with deeply rooted plants, making them suitable for various native flowers, trees and shrubs. Pedestrian pathways and gathering areas can also be incorporated into the design of intensive green roofs.
Within these two types of green roofs are two installation type systems:
- Modular system: green roof component layers are fused together as a moveable modular block system that can be linked together with other green roof blocks to form the green roof. This type of system typically forms an extensive green roof type and are used where roofs are sloped and flat.
- Layered system: all components' layers are loose laid as individual layers. This type of system can form both extensive and intensive green roofs and used typically on flat roofs.
Component description[edit]


- Vegetation free zone: separates the green roof perimeter from the roof perimeter and other structures on the roof (e.g., vents), that is kept devoid of vegetation and natural debris.
- Root barrier: often a clear plastic sheet, the root barrier layer protects the water-proofing membrane from root penetration and degradation by microbial activity.
- Drainage layer: provides void space for excess water to drain from the growing media that is either stored for later uptake by plants or allowed to flow to roof drain.
- Filter fabric or geotextiles: are used to retain growing media and prevent migration out of green roof system
- Growing media will vary according to the green roof system/product installed but is generally designed to be porous and lightweight with adequate fertility and drainage capacity to support plant growth and allow for absorption and infiltration of water.
- Vegetation: Green roofs rely on vegetation (i.e., sedums/succulents, grasses, herbs, wildflowers and for intensive green roofs, shrubs and trees) to intercept, absorb and evapo-transpire stormwater. Vegetation can be installed as mats or as plugs or pots based upon the green roof design.
- Overflow outlets: Flows exceeding the storage capacity of the BMP are conveyed to an adjacent drainage system via an overflow outlet structure and the roof drainage system.
- Irrigation System (if applicable): Most green roofs will require periodic irrigation, especially during the first 2 months of the establishment period. See the page on green roofs for additional information on irrigation systems.
- Leak detection system (if applicable): leak detection systems should be used to periodically check for the presence of leaks in the water-proofing membrane. See the page on green roofs for additional information on leak detection systems.
Key construction steps[edit]
The construction processes for modular and layered green roofs are similar but not identical. The table below summarizes the key steps for the construction of each type of green roof.
| Green roof type | Construction steps |
|---|---|
| Modular system |
|
| Layered system |
|
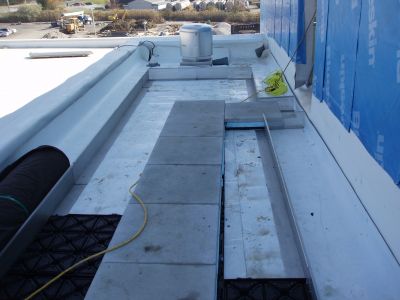
Green roof perimeter installation (Photo Source: CVC)
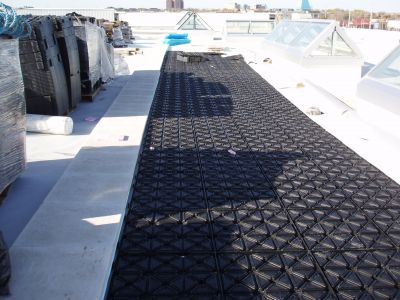
Green roof root barrier and drainage layer installation (Photo Source: CVC)
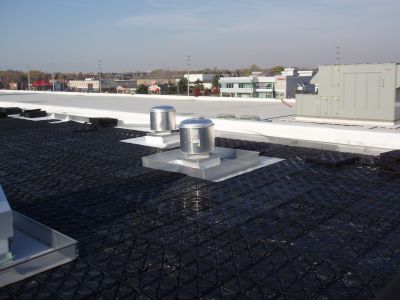
Installation of root free zones around HVAC system (Photo Source: CVC)
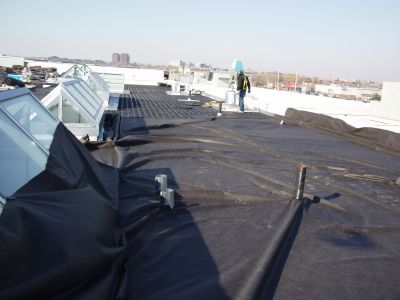
Green roof filter fabric layer installation (Photo Source: CVC)

Installation of green roof soil media (Photo Source: CVC)
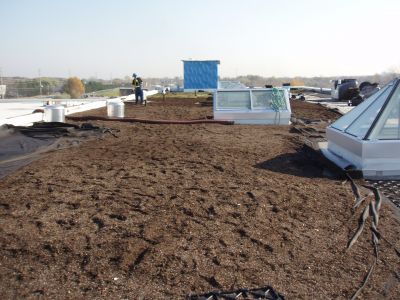
Finished installation of green roof soil media prior to vegetation (Photo Source: CVC)
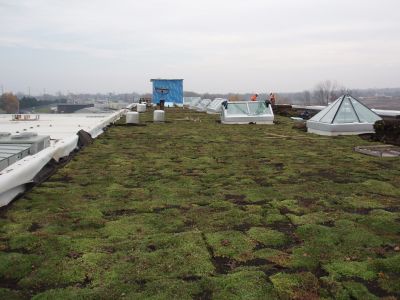
Completed installation of green roof sedum vegetation (Photo Source: CVC)

Modular green roof system (Newtben33, 2013)[5]

Toronto City Hall Podium green roof by LiveRoof, July 2010 (GreenRoofGardener, 2010)[6]


Key inspection points[edit]

Construction inspections take place during several points in the construction sequence, specific to the type of LID BMP, but at a minimum should be done weekly and include the following:
- During site preparation, prior to BMP installation to ensure the roof structure is ready for green roof construction work and confirm that BMP layout area matches approved design drawings and that construction materials meet design specifications;
- After installation of leak detection system (if applicable) to ensure it was installed properly.
- At installation of water-proofing membrane (if a new build or membrane replacement), prior to installation of root barrier, drainage layer and overflow outlets to ensure it was done properly and to confirm that slopes are acceptable;
- After installation of root barrier, drainage layer (including filter fabric/layer) and overflow outlets, prior to installation of growing medium and plants to ensure it was done properly and confirm that depth and slopes are acceptable;
- After installation of growing medium layer and plants to ensure it was done properly and to confirm depth, slopes and elevations at overflow outlets are acceptable;
- After installation of irrigation system to confirm system is functioning;
- Prior to hand-off points in the construction sequence when the contractor responsible for the work changes (i.e., hand-offs between the building and green roof installation contractors);
- After large storm events (e.g., 15 mm rainfall depth or greater) to ensure roof drainage or flow diversion devices are functioning and adequately maintained.
Additional inspections may be needed depending on the number of layers in the green roof design (e.g., insulation, root barrier, and growing medium structural support layers) and may be required to comply with product warranty conditions. The green roof product vendor or designer should provide further guidance in this regard, specific to the system or product being installed. A checklist of construction inspection steps can be found on the Inspection and Maintenance: Green Roofs page.
Mistakes to avoid[edit]
- Green roofs should not be installed on roof slopes greater than 22 degrees or 40 %
- Green roofs should be ideally installed on new roof membranes, not on roofs that are older than 5 years or have noted leaks
- Green roof material storage should not exceed structural load of roof, spread materials evenly across the roof to ensure even load distribution
- Do not install vegetated mats with limited plant coverage. Mats should have a minimal plant coverage of 80 %
- Test and ensure green roof irrigation systems functions properly
References[edit]
- ↑ City of Toronto & Livegreen Toronto. 2017. Toronto Green Roof Construction Standard: Supplementary Guidelines. https://www.toronto.ca/wp-content/uploads/2017/08/7eb7-Toronto-Green-Roof-Construction-Standard-Supplementary-Guidelines.pdf
- ↑ Greenroofs.org. n.d. About Green Roofs. https://greenroofs.org/about-green-roofs
- ↑ TRCA. 2016. Low Impact Development Stormwater Management Practice Inspection and Maintenance Guide. Version 1.0. https://sustainabletechnologies.ca/app/uploads/2016/08/LID-IM-Guide-2016-1.pdf
- ↑ TRCA. 2018. Fact Sheet - Inspection and Maintenance of Stormwater Best Management Practices: Green Roofs. https://sustainabletechnologies.ca/app/uploads/2018/02/Green-Roofs-Fact-Sheet.pdf
- ↑ Newtben33. 2013. Green Roof Shed. Photo. Accessed 21 September 2022. https://commons.wikimedia.org/wiki/File:Green_Roof_Shed.JPG
- ↑ GreenRoofGardener. 2010. Toronto City Hall Podium green roof. Photo. Accessed 21 September 2022. https://commons.wikimedia.org/wiki/File:Toronto_City_Hall_Podium_green_roof_by_LiveRoof,_July_2010.jpg